


Generate a public and private key with PuTTYgen (Windows)
Updated on
Do you want to secure your SSH or SFTP connections on Windows? This step-by-step guide shows you how to generate an SSH key pair (public and private) with PuTTYgen, and how to use it in PuTTY and FileZilla for your SSH and SFTP connections. This can be handy for developers who need to connect to a web hosting account.
Why use an SSH key to authenticate?
Using an SSH key to authenticate considerably strengthens the security of remote connections, in particular over SSH or SFTP.
Unlike a password, which can be guessed or intercepted, an SSH key relies on an asymmetric encryption mechanism: only the person holding the private key can access the server that authorizes the matching public key.
This system greatly reduces the risk of intrusion and automates secure connections without having to type a password every time.
1. Download PuTTYgen
Here are direct links to the latest official 64-bit x86 (recommended) and ARM versions.
To find these links through the official sites:
- Go to the official site: https://www.putty.org.
- Click Download Putty. You will land on https://www.chiark.greenend.org.uk/~sgtatham/putty/latest.html, which is also an official site.
- Click "puttygen.exe" for your architecture (usually 64-bit x86) to download it.
Note: Put the tool in a folder of your choice so you can find it easily.
2. Generate a private/public SSH key pair on Windows
Once PuTTY is launched, you will see the following window:
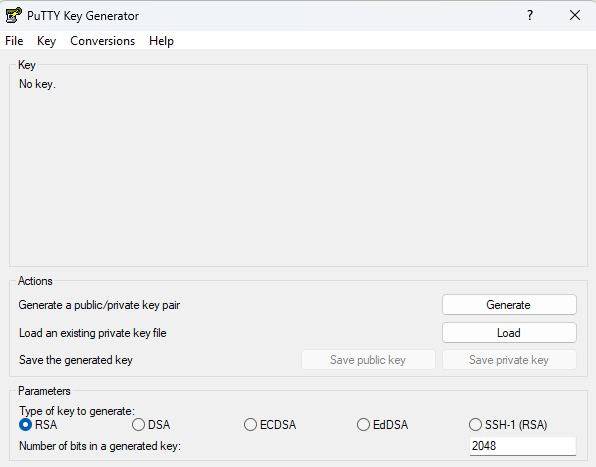
The first setting is at the very bottom: the key type and its size.
2.1 Which SSH key type should you choose?
- The default "RSA" choice is fine.
- Our recommendation in 2025 is EdDSA, which gives shorter public keys with an equivalent level of security, and most servers support it.
- The other modes are generally unused, and for security and modern compatibility reasons, SSH-1 should be avoided (except to connect to a server more than 10 years old).
2.2 Generate the SSH key
- Once the key type is chosen (or left as the default)
- Click "Generate"
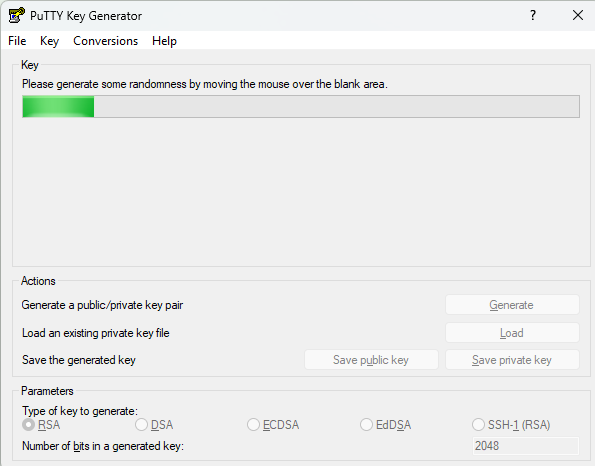
- Move your mouse randomly over the middle of the window to generate the random values required to secure the SSH key.
2.3 Save the SSH key
Warning: If you lose your private key, you lose your access. If you lose your public key, we cannot grant you new access. If someone gets hold of your keys, they can connect to the same services as you. Keep your key in safe, private places.
Once the key is generated, you reach the following screen:
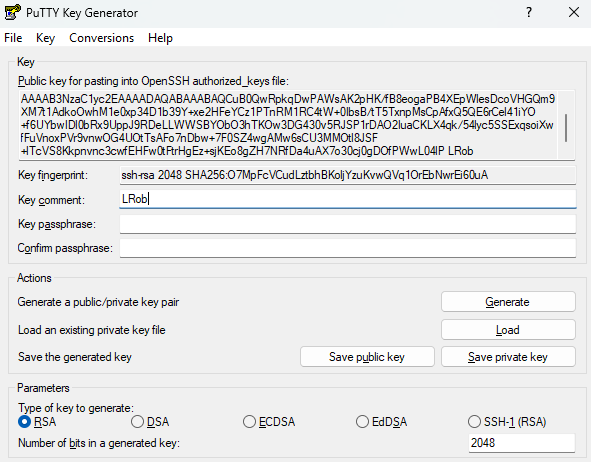
- In the "Key Comment" field, enter a meaningful comment so that it is clear who the key belongs to, for example your first name. This comment will be added at the end of your public key.
- Optionally, set a "passphrase" that will be requested at every connection. It protects you if your SSH key is stolen, but forces you to retype a password each time.
- Click "Save public key", give it a meaningful name, for example "firstname.pub.key", and save it in a safe folder.
- Click "Save private key", confirm the warning, give it a meaningful name, for example "firstname.priv.ppk", and save it in a safe folder.
Which SSH key should I provide to be granted access?
⚠️ Warning: Your private key is like a password and must remain strictly private. If you give your private key to a third party, they will be able to connect to the same servers as you.
When a provider asks for your SSH key to grant you access, they are asking for your public key, and only that.
Configure an SSH key for SSH connections (PuTTY, Windows)
Beforehand:
- Download PuTTY from the official download page.
- Put it in a folder where you will find it again, for example the same folder as PuTTYgen
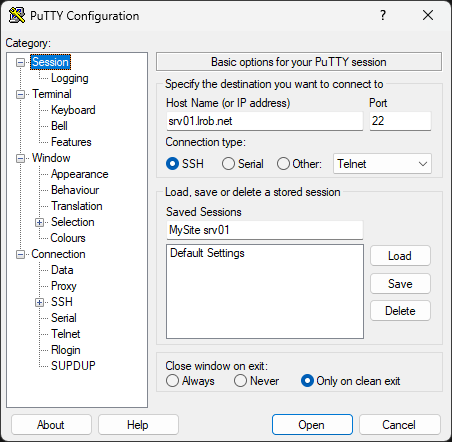
Once putty.exe is launched, you get the following screen:
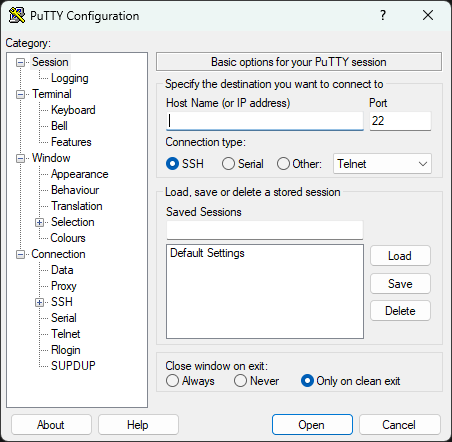
- Enter the server (host name) or the server IP
- Enter the port (default SSH port: 22)
- In the "Saved sessions" field, choose a name for the connection, for example "My site srv01"
See an example
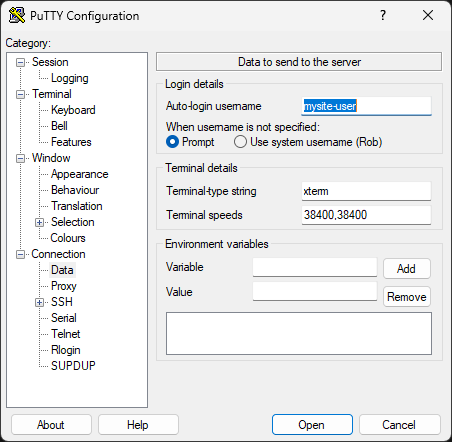
- Go to the tab: Connection/Data
- In "Auto-login username", set your SSH user name (in the example: mysite-user).
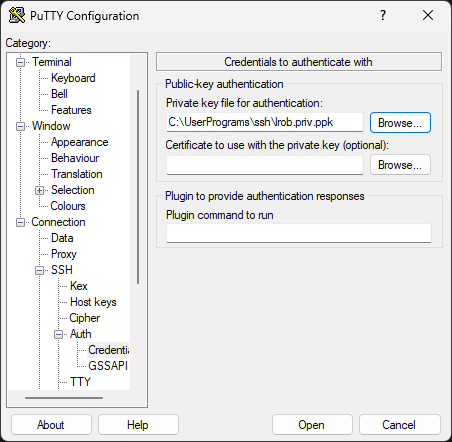
- Go to the tab: Connection/SSH/Auth/Credentials
- In the "Public-key authentication" field, click "Browse" to select your private key, generated earlier with PuTTYgen
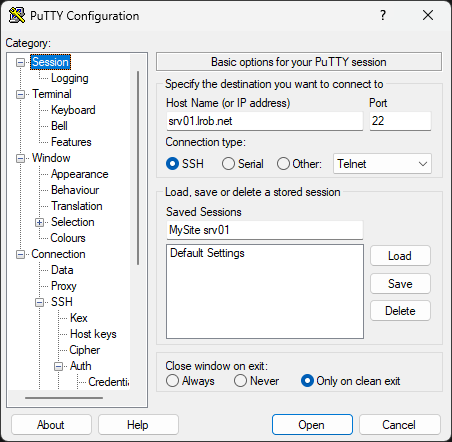
- Go back to the first tab, "Session"
- Save the session by clicking "Save"
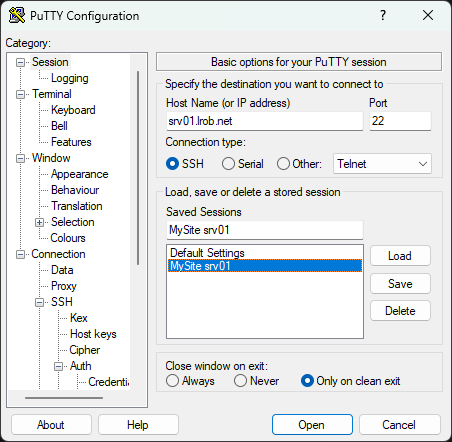
Congratulations, you have set up your SSH key successfully!
To connect, you now just need to:
- Double-click the connection name in the list
- Or click the connection name, then "Open"
Use an SSH key for SFTP (FileZilla Windows)
SFTP lets you browse a server’s files through the SSH protocol. The connection is therefore encrypted, and we will see how to authenticate with an SSH key for an SFTP connection.
Go to the "Site Manager":
- Under "File", then "Site Manager".
- Or by clicking the first icon at the top left, under the "File" menu.
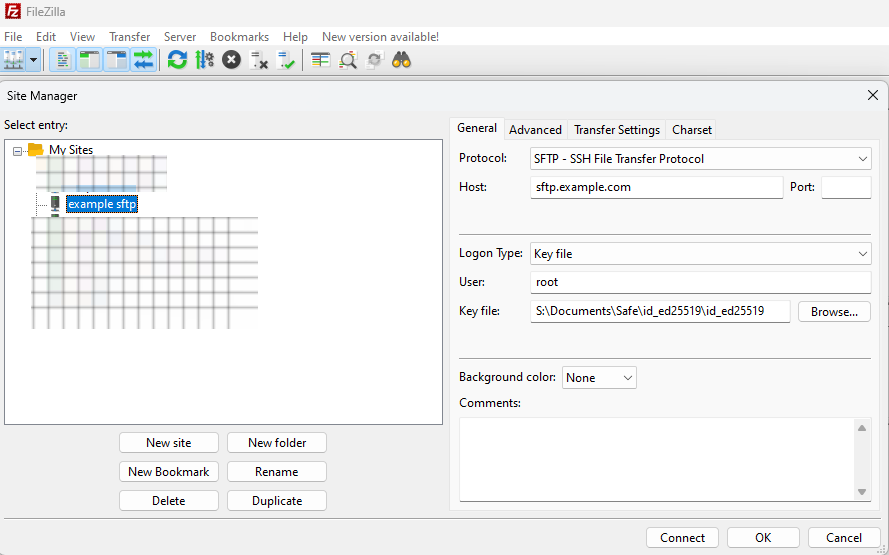
FileZilla Site Manager
- At the bottom left, click "New site", name this connection and make sure it is selected (highlighted).
- In the right-hand pane, select the SFTP protocol and enter the IP or host name of the server provided by your host. Note: the standard port for SSH and SFTP is port 22, which will be used if you leave this field empty.
- Choose the logon type "Key File"
- In "User", enter the user you want to connect as
- In "Key File", click "Browse" to select your private key.
You can then click "Connect" to connect, and reopen this Site Manager window for your future connections.
Bonus: Where does the name “PuTTY” come from?
The name PuTTY is a technical pun. It refers to TTY (short for teletypewriter), a term inherited from the first text terminals used on UNIX and Linux. Even today, command-line interfaces (such as virtual consoles or SSH terminals) that let you interact with a system through text are called "TTY". PuTTY, for its part, is an SSH client (Secure Shell), a protocol that lets you connect to a server, often Linux, securely from a distance through a terminal. The name therefore combines the idea of "TTY" with the purpose of this software: making secure connections to remote systems easier from a Windows environment.
Conclusion
By following this tutorial, you have generated a secure SSH key pair and set up your SFTP access with FileZilla. Remember to keep your private key safe and to back up your public key for future authorizations.
If you want a web host that supports SSH and SFTP, choose LRob Web Hosting. If you have 4 sites or more, check out our Web Agency plans.